Understanding the Exposure Triangle
What is Aperture, Shutter speed, and ISO and how does these things work together to give you a proper photo?
Photography is more than pointing a camera and pressing a button. Every great image begins with understanding light — and that’s where the exposure triangle comes in.
If you’ve ever taken a photo that looked too dark, too bright, blurry, or grainy, chances are one part of the exposure triangle needed adjustment.
The three elements of exposure are:
Aperture
Shutter Speed
ISO
Together, these settings control how much light enters your camera and how your final image looks creatively. Mastering them is one of the biggest turning points for beginner photographers.
What Is Exposure?
Exposure refers to how bright or dark your image appears. A properly exposed photo contains enough detail in both the highlights and shadows without being overexposed (too bright) or underexposed (too dark).
Your camera controls exposure using three settings that work together like a balancing act.
Think of the exposure triangle as a team:
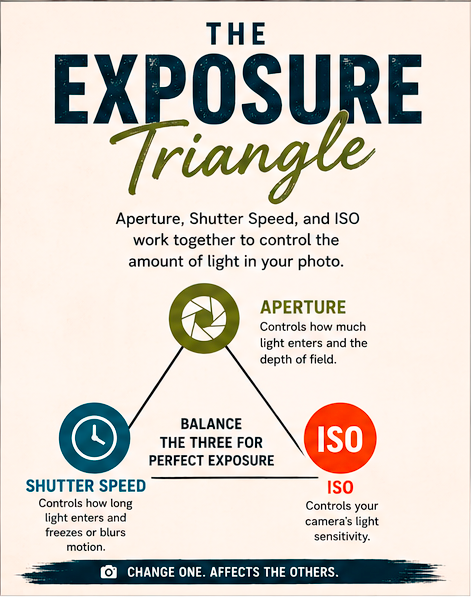
Aperture controls light and depth of field
Shutter speed controls motion
ISO controls brightness sensitivity
Changing one setting affects the others.
Aperture: Controlling Depth and Light
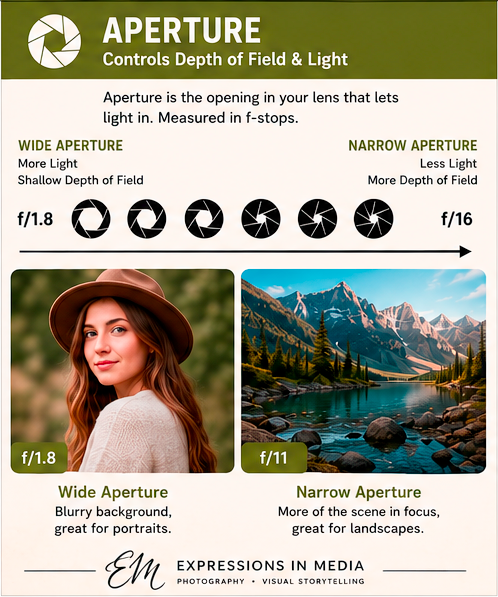
Aperture refers to the opening inside your lens that allows light into the camera. It’s measured in f-stops such as f/1.8, f/4, or f/16.
How Aperture Works
A low f-number (f/1.8) means a wide opening
More light enters the camera
Background becomes blurry
Great for portraits
A high f-number (f/16) means a narrow opening
Less light enters
More of the image stays sharp
Great for landscapes
Creative Effect of Aperture
Aperture mainly affects depth of field, or how much of the image appears in focus.
Wide Aperture Example
f/1.8
Sharp subject
Soft blurry background
Narrow Aperture Example
f/11
More of the scene stays sharp
Better for landscapes and architecture
I like to think of it this way: the lower the number the less pixels (parts of the image) are going to be in focus. The higher the aperture number, the more pixels are going to be in focus.
Shutter Speed: Freezing or Blurring Motion
Shutter speed controls how long your camera sensor is exposed to light.
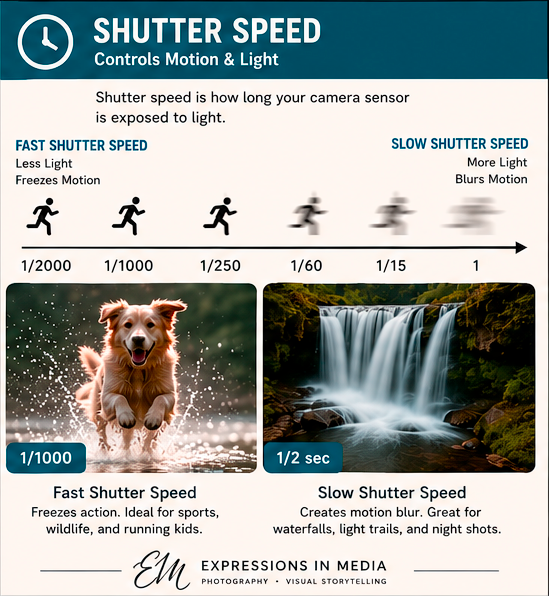
Common shutter speeds include:
Fast Shutter Speeds
These freeze motion and are ideal for capturing sports/action or fast moving subjects and wildlife. Some examples of fast shutter speeds are:
1/500
1/1000
1/2000
Slow Shutter Speeds
Slower shutter speeds are useful for capturing the motion rather than freezing it. A lot of creativity can result from slower shutter speeds, such as: waterfall motion, light trails in night photos, and some motion blur during action photography.
Some examples of slower shutter speeds are:
1/30
1 second
10 seconds
Important Tip
Remember that your shutter speed and how it will capture your image depends on the amount of light that is coming in to your lens. The more light there is the higher your shutter speed might have to be in order to freeze your subjects in the photo.
Also, the slower your shutter speed, the more the slightest movement (like a jittery hand) will result in a slightly blurry photo. Using a tripod becomes important at when user slower shutter speeds.
ISO: Your Camera’s Light Sensitivity
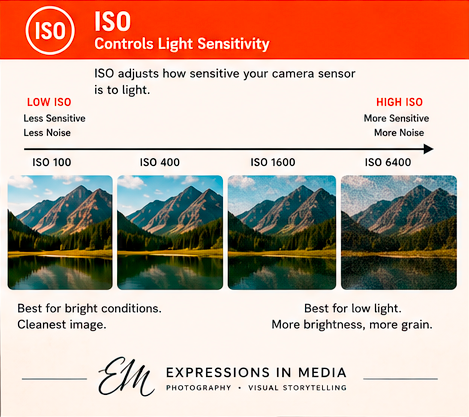
ISO controls how sensitive your camera sensor is to light.
Low ISO
ISO 100 or 200
Cleaner image
Less grain/noise
Best for daylight
High ISO
ISO 1600 or higher
Brighter image in dark situations
More digital grain/noise
ISO is extremely useful in low light, but increasing it too much can reduce image quality.
How the Exposure Triangle Works Together
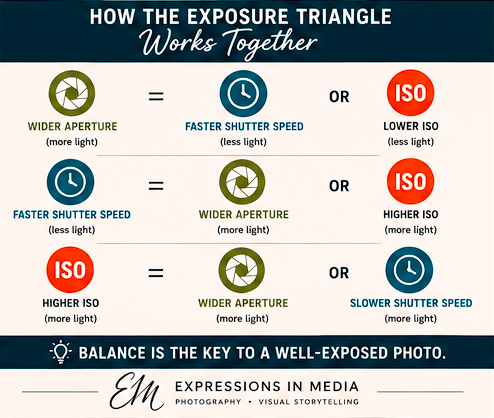
The key to understanding exposure is realizing that all three settings affect one another.
For example:
If you widen your aperture, more light enters the camera
You may need a faster shutter speed or lower ISO to compensate
Or:
If you use a faster shutter speed to freeze action
You may need a wider aperture or higher ISO to keep the image bright enough
Photography is all about balance.
A tip that I learned as I went to make it easier on the go and for those “in the moment I don’t have time to think” shots: If you increase your aperture number by three “clicks” on your dial you either need to decrease your ISO or your shutter speed (not both just one of them) also by three “clicks” on the dial. The same goes for the other settings. If you increase your shutter speed by four “clicks” on your dial, you should decrease your ISO by four “clicks” if you want to keep the same depth of field. If you can’t decrease your ISO or are okay with having a shallower depth of field (or more blurry background) then decrease your aperture by the same amount you just decreased your shutter.
Beginner Exposure Cheat Sheet
Portrait Photography
Aperture: f/1.8–f/2.8
Shutter Speed: 1/200+
ISO: 100–400
Landscape Photography
Aperture: f/8–f/16
Shutter Speed: Depends on lighting
ISO: 100
Sports Photography
Aperture: f/2.8–f/4
Shutter Speed: 1/1000+
ISO: 400–3200
Night Photography
Aperture: Wide open
Shutter Speed: Slow
ISO: Higher as needed
The Best Way to Learn Exposure
The fastest and best way to understand the exposure triangle is through practice. Get out and shoot. Don’t have a purpose or a reason. Just shoot. Pick a random object and do the following:
Put your camera in Manual Mode
Photograph the same subject multiple times
Change only one setting at a time
Compare the results
You’ll quickly begin to see how each setting changes the mood, brightness, and style of your image.
Tip on this: I find it best to bring my computer with me to download and look at the photos right away. Otherwise I get busy and enough time may pass before I am able to get back to them and by that time I forget what I was doing and have to examine the settings a little bit more closely and harder to refresh myself of what I did.
And if you are thinking “I can’t lug around everything with me. Or I don’t have a laptop, just a desktop computer.” well, guess what. You don’t have to go far for this exercise. You could do it right in your living room, although you will have a better understanding if you maybe go out on your front porch or in your own yard where there are plenty of subjects and light to use.
Final Thoughts
Understanding the exposure triangle is one of the most important foundations in photography. Once you learn how aperture, shutter speed, and ISO work together, you gain a greater creative control over your images instead of letting the camera decide everything for you.
Every professional photographer started by learning these same three settings. And every photographer was in your shoes. So don’t feel discouraged and try not to feel overwhelmed.
The more you experiment, the more natural making the changes to your settings will become. But be careful, you might just catch yourself making the changes and feeling proud of yourself…especially when you see the awesome resulting image.